Sauces & Condiments
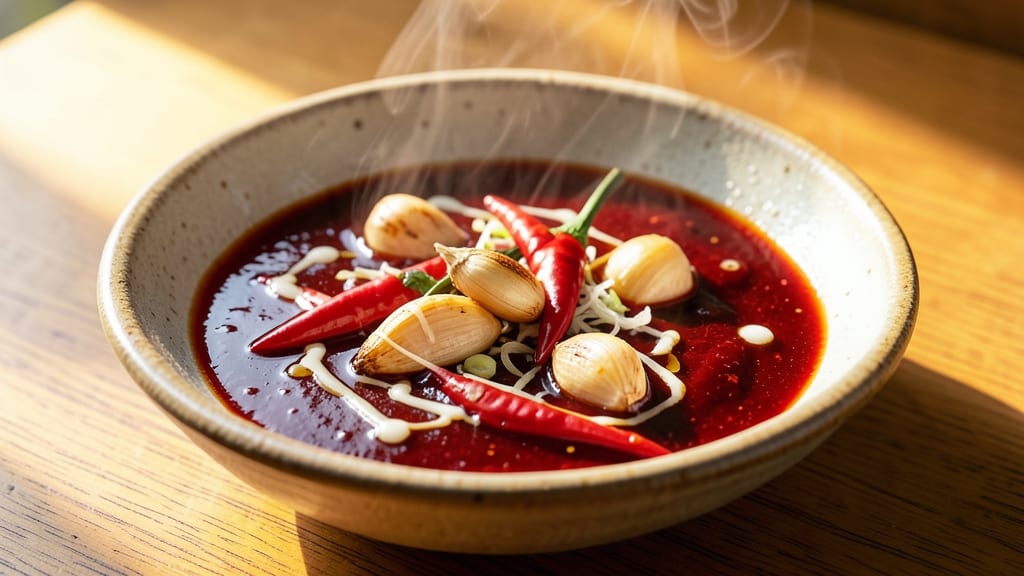
This Asian chilli sauce recipe delivers the perfect balance of heat, sweetness, and tang that elevates stir-fries, dipping sauces, and marinades. The secret lies in simmering fresh aromatics with vinegar and sugar until they meld into a glossy, flavor-packed sauce that clings to every bite.
I’ve perfected this version over years of testing—it’s bold enough to stand alone but versatile enough to adapt to any dish.
What sets this sauce apart is the three-stage cooking process: first, toasting garlic and shallots to deepen their flavor; then simmering with vinegar and sugar to create a glossy base; and finally, blending in chili peppers for a smooth yet fiery finish.
The result is a sauce that’s sticky, aromatic, and packed with layers of umami, thanks to a touch of fish sauce and soy sauce. It’s the kind of condiment that transforms simple dishes into restaurant-worthy meals.
The sauce thickens as it cools, making it ideal for dipping spring rolls or drizzling over noodles. A splash of lime juice right before serving brightens the flavors, while a sprinkle of sesame seeds adds texture.
Store it in the fridge for up to two weeks—though I guarantee it won’t last that long. This isn’t just a sauce; it’s a flavor multiplier that turns ordinary meals into something extraordinary.
Use it as a dipping sauce for dumplings, a stir-fry glaze, or even a marinade for grilled meats. The possibilities are endless, but the technique is simple: balance, patience, and a willingness to taste as you go. Let’s make it.
Ingredients for asian chilli sauce
Nine ingredients, three stages—this sauce turns simple pantry staples into restaurant-worthy heat.
| Ingredient | Amount | Notes |
|---|---|---|
| Garlic Cloves 🧄 | 6 cloves | Toasted until fragrant |
| Shallots 🧅 | 3 whole | Thinly sliced, peel removed |
| Fresh Red Chili Peppers 🌶️ | 4 whole | Thai or serrano, seeds removed |
| White Vinegar 💧 | ½ cup | Distilled preferred |
| Granulated Sugar 🍚 | ¼ cup | Light or dark brown works too |
| Fish Sauce 🐟 | 2 tbsp | Red Boat preferred |
| Soy Sauce 🥢 | 2 tbsp | Light or dark variety |
| Sesame Oil 🫒 | 1 tbsp | Toasted for aroma |
| Toasted Sesame Seeds 🌰 | 1 tbsp | For garnish |
| Lime Juice 🍋 | 2 tbsp | Freshly squeezed |
The garlic and shallots are where the magic starts. Toast them in oil until golden—that deep, nutty aroma is non-negotiable. I grab Red Boat fish sauce from the Asian market (it's worth the splurge), but any quality brand works. For chili peppers, Thai or serrano give that perfect balance of heat and fruitiness—none of that bland bell pepper nonsense. The vinegar should be white distilled, not that weird apple cider stuff. And if you're feeling fancy, toast your sesame seeds in a dry pan first—they'll add crunch and depth.
No fish sauce? Extra soy sauce plus a pinch of salt gets you close. Running out of lime? Lemon juice works in a pinch, though it's not quite the same. The sugar can be swapped for honey (though it's not vegan), or maple syrup for a different vibe. Want more heat? Add a dash of chili flakes or extra chopped peppers. Less heat? Strain out some seeds before blending. And if you're making this ahead, add the lime juice right before serving—it keeps the sauce bright.
This sauce thickens as it cools, so store it in a sealed jar and give it a stir before each use. Keeps for 2 weeks in the fridge, though I've never had leftovers that long. For extra flavor, let it sit at room temp for 10 minutes before drizzling—it develops even more depth. And if you're feeling ambitious, freeze portions in ice cube trays for quick single-use servings.
Why You'll Love This Recipe
- No Chopping Nightmare: I swear by this recipe because it’s the rare sauce where you only need to smash garlic and shallots with the flat side of your knife—no dice, no tears. The chili peppers? Just slice them open, scrape out the seeds, and toss them in whole. Honestly, my lazy Sundays thank me every time.
- Sweet Heat Balance: That perfect push of sugar against the vinegar and fresh chili? It’s ridiculously addictive. The shallots caramelize just enough to add depth, while the garlic gives it that warm, cozy kick. I’ll be real: I’ve caught myself sneaking extra spoonfuls straight from the jar.
- Pantry Staple Magic: This sauce turns anything into a star—drizzle it over noodles, toss it with stir-fried veggies, or even mix it into mayo for a quick dipping sauce. (Yes, even on a Tuesday night.) The best part? It keeps for weeks in the fridge, so you’re always covered when inspiration—or cravings—strike.
- Budget-Friendly Fire: Garlic, shallots, and chili peppers are cheap, and this recipe uses them wisely. A little vinegar and sugar stretch it further, so you’re not just making sauce—you’re making value. My college self would’ve wept with joy over how much flavor you get for pennies.
Step-by-step instructions for Asian chilli sauce
Here's how to make a perfectly balanced sauce that's ready in under 30 minutes.
Toast the Aromatics for Maximum Flavor
Heat a dry skillet over medium heat and add the 6 cloves garlic cloves. Toast them for 1-2 minutes until they turn golden and smell fragrant—this develops their natural sweetness. Remove and set aside immediately, as garlic burns quickly.
In the same skillet, add the 3 whole shallots (peeled and thinly sliced) and cook for 3-4 minutes until softened and golden. You want them to caramelize slightly, which adds depth to the sauce. Real talk: don't walk away—burnt shallots make the sauce bitter.
Cook the Chili Peppers Until Soft
Add the 4 whole fresh red chili peppers (seeds removed) to the skillet with the shallots. Cook for 5-6 minutes until they soften and release their oils. You'll know they're ready when they collapse slightly and smell intensely aromatic. The peppers should be soft enough to mash easily with a spoon.
I like to leave the peppers whole for even cooking, but if you prefer, you can chop them first. Just be careful—they'll be hot! The key here is to cook them until they're fully softened but not mushy. This ensures they'll blend smoothly into the sauce without any grainy texture.
Build the Sauce Base with Vinegar and Sugar
Transfer the chili-shallot mixture to a blender or food processor. Add the 0.5 cup white vinegar and 0.25 cup granulated sugar. Blend until completely smooth, scraping down the sides as needed. The vinegar helps balance the heat while the sugar caramelizes slightly, creating that signature sweet-spicy flavor.
Taste the mixture at this point—it should be tangy and slightly sweet. If it's too sharp, add a pinch more sugar. If it's not sweet enough, add a splash more vinegar. This is where you adjust the balance before adding the more complex flavors. Don't skip this step—it's your chance to dial in the perfect foundation.
Finish with Umami and Brightness
Return the blended mixture to the skillet and stir in the 2 tbsp fish sauce, 2 tbsp soy sauce, and 1 tbsp sesame oil. Simmer over medium-low heat for 5-7 minutes until the sauce thickens slightly and coats the back of a spoon. The fish and soy sauces add that deep umami flavor that makes this sauce so addictive.
Finally, stir in the 2 tbsp lime juice and remove from heat. The lime juice brightens the whole sauce, cutting through the richness. Let it sit for 5 minutes to let all the flavors meld together. You'll notice the sauce becomes even more cohesive and flavorful during this resting time.
Garnish and Serve
Transfer the sauce to a serving bowl and sprinkle with the 1 tbsp toasted sesame seeds. These add a beautiful crunch and nutty aroma that complements the sauce perfectly. The seeds should be evenly distributed—just a few sprinkles on top are enough to make a visual impact.
This sauce is incredibly versatile—use it as a dipping sauce for spring rolls, a stir-fry glaze, or even a marinade for grilled meats. It keeps well in the refrigerator for up to 2 weeks, so you can make a big batch and enjoy it all week. The flavors actually improve as it sits, developing even more depth over time.
Pro Tips For Making Asian Chilli Sauce
- CHAR THE GARLIC LOW: I learned this the hard way—garlic burns faster than you think. Cook your minced garlic and shallots over medium-low heat until they’re just golden, not browned. If they darken, you’ve lost that sweet, aromatic depth the sauce needs.
- SEED THE CHILIS RIGHT: Remove the stems and seeds from your fresh red chilies, but leave the ribs intact—that’s where the heat lives. If you’re using Thai or bird’s eye chilies, wear gloves; the oils will sting. (Yes, even if you’re impatient like me.)
- STIR CONSTANTLY AFTER ACID: Once you add the vinegar, the sauce will bubble furiously. This is when it’s easy to walk away—don’t. Keep stirring for at least 30 seconds to prevent scorching. I’ve ruined batches by letting it sit too long here.
- BALANCE SWEETNESS LAST: Add the sugar after the vinegar has cooked down but before you simmer too long. Taste as you go—Asian chili sauce should hit all three notes: heat, tang, and just enough sweetness to cut the acid. If it’s too sharp, a pinch more sugar now saves straining later.
Dietary considerations for this recipe
Gluten-Free Adaptation
This sauce is naturally gluten-free as written, but always double-check your fish and soy sauces—some brands contain hidden gluten. I recommend Red Boat fish sauce (certified gluten-free) and Kikkoman tamari instead of regular soy sauce. The swap is seamless since tamari has the same umami punch without the gluten. 🌱
Vegan-Friendly Swaps
For a vegan version, replace the 2 tbsp fish sauce with 2 tbsp coconut aminos (it mimics fish sauce's saltiness) plus 1 tbsp nutritional yeast for umami depth. Skip the sesame oil if avoiding all animal products, or use vegan sesame oil.
The lime and vinegar keep it bright, while the toasted sesame seeds add texture without dairy or animal fats.
Low-Sodium Options
If you're watching sodium, reduce the fish and soy sauces to 1 tbsp each and add ½ tsp salt instead. For extra flavor without salt, increase the garlic to 8 cloves and add 1 tsp grated ginger during the toasting stage.
The ginger enhances the sauce's complexity while keeping sodium in check. Always taste as you go—adjustments are easy at this stage!
Allergy-Free Adjustments
Sesame allergies? Omit the sesame oil and seeds, or substitute 1 tsp neutral oil (like avocado oil) for the sesame oil. For nut allergies, ensure your sesame seeds are processed in a dedicated facility (many are, but always check labels).
If avoiding garlic or shallots, replace them with 1 tbsp finely chopped onion (cooked until caramelized) for depth.
Heat Level Control
Want milder heat? Remove all seeds and membranes from the 4 chili peppers before cooking. For extra spice, add ½ tsp chili flakes or 1 finely chopped Thai chili after blending.
I keep a small bowl of rice nearby when testing heat levels—it’s a great palate cleanser if things get too fiery! 🌶️
Nutrition facts
Frequently asked questions
Can I make this sauce without fresh chili peppers?
Use 2 tbsp chili flakes or 1 tbsp chili garlic sauce instead of fresh peppers. For a smoother texture, blend the chili flakes with 1 tbsp water before adding to the sauce. If you prefer a milder heat, reduce to 1 tbsp flakes and add ½ tsp sugar to balance the flavor.
How do I adjust the sweetness or spice level?
For more sweetness, add 1 extra tablespoon of sugar during the blending stage. For extra heat, include 1 extra chili pepper or ½ tsp cayenne pepper after simmering. Always taste as you go—small adjustments make a big difference! The sauce should have a 30/70 sweet-spicy balance for ideal flavor.
Can I store this sauce in the freezer?
Yes, but freeze it in ice cube trays for single-use portions. Once frozen, transfer the cubes to a freezer bag. Thaw overnight in the fridge before using. The texture may become slightly grainy after freezing, but it’s still delicious. For best results, use within 1 month of freezing.
What can I use this sauce for besides dipping?
This versatile sauce works as a marinade for grilled chicken or tofu, a glaze for stir-fried noodles, or a drizzle over fried rice or spring rolls. It also elevates burgers, tacos, or even deviled eggs with a spicy kick. A splash in ramen or pho broth adds instant depth. The possibilities are endless!
Why did my sauce turn out too thin?
If your sauce is too thin, simmer it uncovered for 5-10 extra minutes to reduce the liquid. Alternatively, blend 1 tbsp cornstarch with 1 tbsp water, stir it into the sauce, and cook until thickened. Avoid adding raw cornstarch directly—it can create lumps. The sauce should coat the back of a spoon when done.