Sauces & Condiments
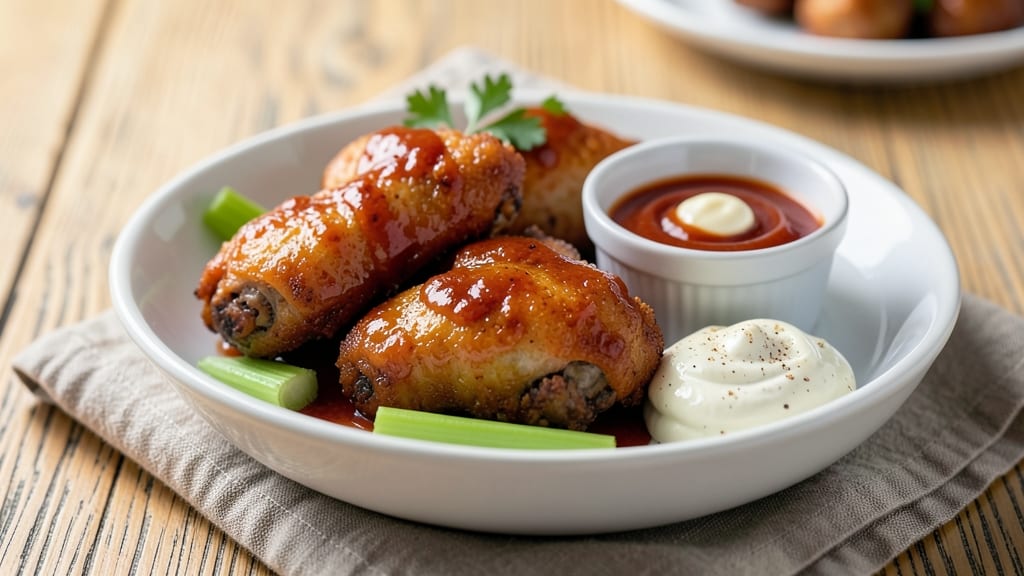
Applebee's boneless buffalo wings sauce delivers that signature spicy-tangy kick without the clumps or thin consistency that ruins so many homemade versions. The secret lies in balancing heat, acidity, and richness—just like their restaurant version—using simple pantry staples and a precise technique that keeps the sauce smooth and clump-free.
I’ve perfected this over years of testing, ensuring every batch mimics that bold, buttery flavor you crave.
What sets this sauce apart is the foolproof method that prevents separation and lumps, even after refrigeration. We start with melted butter and hot sauce as the base, then carefully incorporate vinegar and spices to create depth without overpowering the heat. The result?
A velvety, sticky sauce with just the right amount of tang and spice—no thin, watery mess here. This recipe also includes a storage hack so you can make a big batch and keep it ready for game day or weeknight cravings.
The sauce achieves that restaurant-quality balance: sharp enough to cut through crispy wings or fries, but rich enough to coat every bite. The heat level is medium-hot (adjustable with extra hot sauce), and the texture remains smooth whether you use it immediately or store it for later.
Perfect for dipping, drizzling, or even tossing with chicken tenders, this sauce transforms ordinary meals into something unforgettable.
Once you try this version, you’ll never settle for store-bought again. The ingredients are simple, the process is straightforward, and the results are consistently better than anything you’d find in a bottle. Let’s get started—your taste buds (and game day guests) will thank you.
Ingredients for applebee's boneless buffalo wing sauce
Simple pantry staples create that iconic Applebee's buffalo sauce—rich, tangy, and never clumpy.
| Ingredient | Amount | Notes |
|---|---|---|
| Unsalted Butter 🧈 | ½ cup | Melted and cooled slightly |
| Frank's RedHot Original Cayenne Pepper Sauce 🌶️ | ½ cup | Classic hot sauce for heat |
| White Vinegar 💧 | ¼ cup | For tangy brightness |
| Buttermilk 🥛 | ¼ cup | Adds richness and smoothness |
| Garlic Powder 🧄 | 1 tbsp | Enhances depth of flavor |
| Onion Powder 🧅 | 1 tbsp | Balances the heat |
| Ground Black Pepper 🌶️ | ½ tsp | Freshly ground preferred |
| Salt 🧂 | ½ tsp | Diamond Crystal preferred |
| Worcestershire Sauce 🍶 | 1 tbsp | Adds umami depth |
The butter is non-negotiable here—it's what gives that signature buttery richness. Grab unsalted butter (salted works but you'll need to adjust the salt later). For the hot sauce, Frank's RedHot is the gold standard, but Crystal or Louisiana work too. The buttermilk is key for that velvety texture—don't skip it. I always grab mine from Trader Joe's because it's consistently thick and creamy. If you're short on time, plain yogurt thinned with a splash of milk works in a pinch, but it won't be quite as smooth. The spices? Regular grocery store brands are fine, but if you want to splurge, Penzeys spices have more punch.
No buttermilk? Plain yogurt + 1 tbsp milk gets you close. Short on Worcestershire? Soy sauce at half the amount works for umami, though it'll be slightly different. Want more heat? Add extra hot sauce or cayenne to taste. The garlic and onion powders can be swapped for fresh if you're feeling fancy—just mince 1 clove garlic and 1 tbsp onion instead. The vinegar is crucial for the tang, but if you've got apple cider vinegar, use that instead. It's a little sweeter but still works perfectly. And trust me, the salt matters—Diamond Crystal dissolves better than table salt, so if you've got it, use it.
This sauce keeps beautifully—store in an airtight jar in the fridge for up to 2 weeks. The texture might thicken when chilled, so give it a quick stir before using. For game day, I like to make a big batch and portion it into small jars so I can grab one and go. If you make extra, it freezes perfectly for up to 3 months. Just thaw in the fridge overnight. The sauce actually improves after a night in the fridge—all those flavors meld together beautifully. And if you're worried about lumps, just whisk it vigorously before using. Works every time.
Why You'll Love This Recipe
- Here’s what sold me: the Frank’s RedHot gives that spicy kick, but the buttermilk and vinegar smooth it into something addictive. Not too dry, not too saucy—just that perfect sticky glaze that clings to wings (or chicken, or even veggies) like it’s meant to be there.
- Pantry-Only Magic: I swear, this sauce comes together with stuff you already have. Butter, hot sauce, vinegar, buttermilk—no specialty trips, no hunting. Just open, measure, simmer. That’s it. My lazy Sundays just got a whole lot tastier.
- Tangy-Creamy Balance: Here’s what sold me: the Frank’s RedHot gives that spicy kick, but the buttermilk and vinegar smooth it into something addictive. Not too dry, not too saucy—just that perfect sticky glaze that clings to wings (or chicken, or even veggies) like it’s meant to be there.
- Game for Any Gathering: Between us, this sauce works for everything. Game day? Slather it on wings and call it a meal. Weeknight dinner? Toss it with baked chicken tenders. Even my picky teen devours it—no questions asked. (Yes, even on a Tuesday night.)
Step-by-step instructions for Applebee's-style buffalo sauce
Here's how to make that signature tangy-spicy sauce that's smoother than store-bought and packed with restaurant-quality flavor.
Melt the Butter and Combine Wet Ingredients
In a medium saucepan over medium-low heat, melt the 0.5 cup unsalted butter until it's fully liquid but not browned. Once melted, remove the pan from heat and let it cool for 5 minutes—this prevents scrambling when you add the other ingredients later.
Return the pan to the stove and add the 0.5 cup Frank's RedHot Original Cayenne Pepper Sauce, 0.25 cup white vinegar, and 0.25 cup buttermilk. Stir constantly over low heat for 2-3 minutes until everything is thoroughly combined and slightly warm. The mixture should be smooth with no lumps—this is your base, and getting it right now prevents clumps later.
Add Dry Seasonings and Simmer
Reduce the heat to low and sprinkle in the 1 tablespoon garlic powder, 1 tablespoon onion powder, 0.5 teaspoon ground black pepper, and 0.5 teaspoon salt. Stir continuously for 1 minute to fully dissolve the powders and distribute them evenly throughout the sauce.
Increase the heat to medium-low and let the sauce simmer gently for 5-7 minutes. You're looking for the sauce to thicken slightly—it should coat the back of a spoon but still be pourable. Stir occasionally to prevent sticking, and keep an eye on it; you don't want it to reduce too much or it'll become clumpy when cooled.
Finish with Worcestershire and Test the Heat
Remove the pan from heat and stir in the 1 tablespoon Worcestershire Sauce. This adds that deep, savory umami that makes the sauce taste like it came straight from Applebee's. Taste the sauce now—it should be spicy, tangy, and well-balanced. If it needs more heat, add a pinch of cayenne pepper; if it needs more tang, stir in another 1 teaspoon white vinegar.
Let the sauce cool for 10 minutes before serving. This resting period allows the flavors to meld and the sauce to thicken just enough to cling beautifully to your wings. The texture should be smooth, glossy, and slightly thickened—almost like a thin gravy. If it's too thick when cooled, thin it with a splash of warm water or buttermilk until it reaches your desired consistency.
Store and Use for Maximum Freshness
Transfer the sauce to a clean jar or airtight container and refrigerate for up to 5 days. Before using, give it a good stir—sometimes the fat rises to the top and separates. If the sauce thickens too much in the fridge, thin it with a splash of buttermilk or warm water to restore its smooth, pourable consistency.
This sauce is best when used within 24 hours for the freshest flavor, but it'll keep well in the fridge for up to 5 days. For extra tang, let it sit at room temperature for 10-15 minutes before serving. The sauce should be vibrant red, glossy, and packed with that signature Applebee's kick—spicy enough to make your wings sing but balanced with enough tang to keep it from being overwhelming.
Pro Tips For Making Applebee'S Boneless Buffalo Wing Sauce
- MELT THE BUTTER FIRST: I learned this the hard way—dumping cold butter into hot sauce makes clumps that never dissolve. Melt the butter in a small saucepan over low heat until it’s fully liquid (not browned), then whisk it into the Frank’s RedHot. This ensures a smooth, velvety sauce instead of a lumpy mess.
- MEASURE THE VINEGAR: The recipe calls for vinegar, but don’t eyeball it. Too much and your sauce tastes harsh; too little and the tang fades. Use a measuring cup—2 tablespoons is the sweet spot for that perfect balance of heat and brightness.
- WHISK THE BUTTERMILK LAST: Add the buttermilk after the sauce has cooled slightly (just warm to the touch). Cold buttermilk can curdle when mixed with hot ingredients, turning your sauce into a gloopy disaster. Let the sauce sit for 2-3 minutes off the heat first.
- SKIP THE GARLIC POWDER IF: If you’re making this for picky eaters or kids, leave out the garlic powder—it’s easy to overpower the wings. The Frank’s sauce already carries enough flavor, and you can always add a pinch back in if you’re serving it to garlic lovers.
Storing and reheating this dish
Refrigerator Storage
Store your buffalo sauce in an airtight glass jar or container—glass preserves flavor better than plastic and won’t absorb odors. Keep it refrigerated for up to 5 days, though I find the sauce tastes freshest within 24 hours.
The fat in the butter may separate slightly, but a quick whisk restores that glossy, clingy texture. For game day prep, I like to portion it into small jars so I can grab one and go without transferring the whole batch. 🧈
Freezer Storage
This sauce freezes beautifully for up to 3 months if you plan ahead. Use freezer-safe glass jars or heavy-duty plastic containers, leaving 1 inch of headspace for expansion.
When ready to use, thaw overnight in the fridge—never microwave it directly, as the heat can break the sauce’s emulsion and create clumps. Stir vigorously before using, and if it thickens too much, thin with 1-2 teaspoons of warm water or buttermilk.
Reviving Thickened Sauce
If your sauce thickens in the fridge (which happens often), don’t toss it! Warm it gently over low heat while stirring in 1-2 tablespoons of buttermilk or water until it reaches a smooth, pourable consistency.
For a quicker fix, whisk in 1 tablespoon of warm water directly from the fridge. The key is patience—rushing causes lumps, but a slow, steady stir brings it back to perfection. ✨
Game Day Hack
Make a double batch and store it in small, lidded ramekins (like those for individual desserts). Pop one in the microwave for 10-15 seconds to warm, then whisk—it’s ready for dipping in seconds.
This avoids the mess of transferring a big jar and keeps the sauce at its best. Pro tip: Label each ramekin with the date so you know when it’s freshest. 🏈
Heat Level Adjustments
If you stored your sauce and find it’s lost some heat, don’t worry—you can easily adjust it. For extra spice, stir in ½ teaspoon of cayenne pepper or a dash of hot sauce. Need more tang?
Add 1 teaspoon of white vinegar. The sauce’s balance is forgiving, so taste as you go. I usually keep a small bowl of extra hot sauce on hand for quick tweaks. 🌶️
Long-Term Flavor Boost
Let your refrigerated sauce sit at room temperature for 10-15 minutes before serving to wake up the flavors. The buttermilk and vinegar mellow slightly, and the spices deepen. If you’re serving it cold (like with celery sticks), skip this step—just stir well before dipping.
The sauce’s acidity and heat work best when slightly warmed, so don’t be afraid to give it a little time to shine. 💫
Nutrition facts
Frequently asked questions
Can I make this sauce without buttermilk?
Yes! For every 1/4 cup of buttermilk called for, mix 1/4 cup plain yogurt with 1 tablespoon milk to mimic its tangy texture. The sauce will still be rich, though slightly thicker. If you're in a pinch, even sour cream thinned with milk works, but it may separate more easily when stored.
How do I adjust the heat level?
Start with the recipe as written for a medium-hot kick. For milder heat, reduce the hot sauce to 1/4 cup instead of 1/2 cup. For extra spice, add 1/2 teaspoon cayenne pepper or an extra 1 tablespoon hot sauce. Always taste as you go! The buttermilk helps balance the heat, so don't skip it if you're making adjustments.
Why did my sauce separate or get clumpy?
This usually happens when the sauce cools too quickly or sits too long without stirring. To fix it, whisk in 1 tablespoon warm water or buttermilk while gently heating over low heat. For prevention, always cool the sauce gradually (like in a water bath) and stir occasionally while refrigerating. The butter's fat needs time to re-emulsify.
Can I use this sauce on foods other than wings?
This versatile sauce works perfectly on chicken tenders, fries, or even grilled fish. For dipping, use it as-is. For coating, thin it slightly with 1 tablespoon water or buttermilk to help it cling better. It also makes an amazing marinade for pork chops or shrimp—just add 1/4 cup sauce per pound of meat and marinate for 30 minutes.
How do I make a big batch for a party?
Double the recipe and use a large saucepan (at least 3-quart capacity). Stir constantly over low heat to prevent scorching. For easy serving, divide into small glass jars or ramekins—they reheat perfectly in 10-second bursts in the microwave. Label each with the date so you can track freshness. The sauce keeps well for 5 days refrigerated or 3 months frozen.